Google Translate

Tuesday 29 November 2011

Lamb Slamb

When I graduated from university I lived with my buddy Andrew for a few years in a funky apartment just up the street from Casa Loma here in Toronto. I have a lot of fond memories of that place but none are quite so fond as our monthly Lamb Slamb events.

They started when we discovered that our local grocery store would heavily discount cuts of meat that were nearing the end of their shelf lives and once a month whole legs of lamb could be had for a song.  Being social guys fond of cooking, we decided to make an event out of this discount bounty and so we started a monthly dinner where we'd invite our girlfriends, friends and family over to try a different lamb recipe every month.

Over the course of almost four years we were able to trial a startling number of variations, some good, some less than good.  It was no surprise that the old standards (curried, roast with mint sauce, garlic and rosemary rubbed) ranked highly among our friends and family but there were some dark horse entrants (or black sheep as the case has it) the best of which I think was this one.  I have no idea if any of the flavours are authentic but this is what two Canadian dudes who have never been to Morocco came up with when we thought about Marrakech!

1 leg of lamb

Stuffing:
1/2 cup chopped apricots (if you have dried, reconstitute them in water or brandy)
1/4 cup pistachios, shelled, unsalted
3 cloves garlic
1/2 onion, chopped
1 bunch cilantro, roughly chopped
2 tsp olive oil

Spice rub:
3 tsp turmarec
1 tsp cinnamon
1 tsp salt
1 tsp whole allspice (1/2 if ground)
1 tsp whole cloves (1/2 if ground)
1 tsp ground cumin
1/2 tsp garlic salt

Put the stuffing ingredients in a food processor and pulse until well mixed.  if necessary grind the spices and then combine them in a dry frying pan and toast over low heat until they just start to smoke.  Immediately remove from heat and set aside.

Use a boning knife to cut down along the bone to open a pocket between the meat and bone for the apricot stuffing.  Stuff the apricot filling down into the pocket using your fingers or the handle of a wooden spoon to get it all the way down into the meat.  Once stuffed, coat the meat in the spices and brown on all sides over high heat in a bit of oil.

Once browned, transfer the meat into the roasting pan along with any veggies you'd like to cook (I recommend carrots, parsnips and beets) and roast at 400F for about an hour and a half or until internal temperature hits 130F on a meat thermometer inserted next to the bone.  Because of the wonky shape, of the lamb you'll have a whole bunch of medium rare lamb and a bit of better done so you can cater to everyone's taste.

Monday 28 November 2011

Shredded beet salad

I've spent the past week travelling in Colombia and, like any decent vacation, a main highlight of my travels was sampling the local fare. I delighted in giant platefuls of roasted meat combined with all the best starches - yuca, plantain, corn, and of course potatoes. I sampled chicharrĂ³n, otherwise known as the Spanish pork rind. I was also thrilled to learn that Colombians have mastered the art of making gelato (I triple checked this fact to be sure this wasn't a fluke). After a week of enjoying all of this, combined with the usual vacation diet of cocktails and wine, I was in the mood for something fresh, light, and nutritionally dense. Enter the beet.

Beets are low in calories and high in fibre, vitamin C, folate, and something called Glycine betaine that is great for your heart. They're also delicious (mom, you were right, I did learn to love beets). If you don't like beets, try eating them raw. They're sweet, crisp, and refreshing. I strongly suggest using a food processor to grate them as grating them by hand may result in a hot pink kitchen disaster.

2 large beets, peeled and grated
juice of 1 orange (about 3 tablespoons)
juice of 1/2 lemon (about 1 tablespoon)
1 teaspoon ground coriander
1/8 teaspoon ground cardamom
1/8 teaspoon ground cumin
1 1/2 tablespoon walnut oil
salt and pepper
1/2 cup chopped walnuts

Combine the juices, spices, oil, and a pinch of salt and pepper in a salad bowl and whisk together. Add the grated beets and walnuts and gently toss to coat. If you want to get fancy, garnish with a sprig of watercress or mache and serve.

Friday 25 November 2011

Whisky Sour

Unlike the sweet neon green concoction that you order at the bar, this is a refreshingly tart version that puts the former version to shame.  This is a great cocktail on it's own or enjoyed with Mashuganuts or spiced olives.

1 1/2 oz Whisky (I prefer Maker's Mark Bourbon Whisky)
1 1/2 oz freshly squeezed lemon juice
1 oz Simple Syrup (recipe below)
ice
Maraschino cherry to garnish

Whisky Sour

Combine Whisky, lemon juice and simple syrup, in a martini shaker with ice.  Shake for 30 seconds.  Strain into an Old Fashioned glass, and garnish with a Maraschino cherry.

Simple Syrup

1 cup sugar
1 1/2 cups water

In a pot bring sugar and water to a boil over high heat and stir to dissolve the sugar.  Once sugar is dissolved turn heat down to medium let simmer for 2 minutes.  Remove from heat and let cool.  Any unused syrup can be kept in the fridge and stored for future use.

Thursday 24 November 2011

Whipped Lavender Shortbread Cookies

These cookies are light and delicate, once placed in your mouth they seem to dissolve and melt away like a sandcastle that's too close to the waters edge.  The addition of lavender provides a floral note and certain je ne sais quoi that is delightful. Serve with nice cup of tea, and try not to eat too many!

1 Cup unsalted butter, softened
1 tsp vanilla
1 3/4 Cups all purpose flour, divided
1/2 cup Icing Sugar, sifted
1/4 tsp salt
1 Tbsp lavender buds, finely chopped

Preheat oven to 350F and prepare a baking sheet with parchment paper.

In the bowl of a stand mixer, fitted with the paddle attachment, or in a large bowl with an electric mixer - mix the butter and vanilla for 2 minutes on medium speed.  While butter is mixing; in a bowl combine 1 1/2 cups flour, icing sugar and salt.  In another small bowl combine 1/4 cup flour and lavender buds and reserve.

Add the flour-icing sugar mixture to the butter ~1/2 cup at a time, mixing for 2 minutes between each addition. (Approx. 10 minutes)  Once all incorporated the mixture should be light and fluffy (almost like that of buttercream icing).  Next add the flour and lavender bud mixture and mix on medium speed for a final 2 minutes.

Drop dough by the teaspoonful onto baking sheet, and bake cookies for ~12 minutes or until the edges just barely start to brown.  Remove cookies from oven, and place on cooling rack.

Enjoy.

Wednesday 23 November 2011

The Waffle Project

I'm a big fan of waffles because, they are the best way conceived by man to consume maple syrup, aside from drinking it right out of the bottle.  As a Canadian it's my civic duty to consume at least 1.867 litres of maple syrup annually (it's in the constitution, look it up if you don't believe me) and so I am embarking on the waffle project to better understand how this novel breakfast food may help us all do our civic duty to suck the maple trees dry!

To make this a bit more systematic and thus deserving of the "Project" moniker, I have mapped out 2 primary axes that define what I call the waffle-space
  • X = Doughy vs. fluffy
  • Y = Sweet vs. savory
There are multiple other characteristics crispy vs. fluffy,  round vs. square, small pocket vs large, to name just a few but these tend to be functions of your iron more than the batter so I'm leaving them out of this exercise for the time being.

As seen below, I have taken the liberty to pre-populate the waffle-space with a few well-known examples so that we have a solid set of benchmarks:

The goal of this project is not to make a definitive selection as to the best waffle but rather to explore as much waffle-space as possible by trying different recipes.  I will populate the waffle space as we go and then you can choose your preferred waffle based on personal taste.  I love Wandas waffles both for their doughy/savoriness and for their propensity to locate their stores close to Toronto's exotic dance clubs (that's just good business sense!) but I recognize that others may love the densely sweet concoctions available from the good folks at Waffle-House or the more floury versions that come from Bisquick.  To each their own, I'm just here to help you navigate this complex and interesting landscape.

Because she's a fellow Canadian, I'm starting with Shari's soft waffle recipe followed by her hard waffle recipe and from there we'll see where the adventure takes us.  If anyone has suggestions for recipes, please let me know and I'll put them on the list and then map them into waffle-space for quick comparison. 

Tuesday 22 November 2011

Flambed Grand Marnier pears over baked brie


Baked brie has a certain 1970s ski lodge kind of charm to it.  It makes me think of shag carpet, fondue, Hall & Oates and other awesome '70s throwbacks.  I wasn't actually alive in the 70s, so this is a fake nostalgia, conjured from old photos of my parents, Hunter S. Thompson articles and Charlie's Angels reruns but it's powerful stuff none the less.

When I was in university in the late 90s and early 2000s baked brie made a comeback in a big way, being featured prominently at every house party along with Asiago Artichoke dip (the two were like the Starsky and Hutch of party favours).   While I understood the dish's timeless charm, I was always felt that it could use something to liven it up, to really make it shine like the '70s rock start that it is, something like ... FIRE!

It's important to remember that you really are playing with fire in this recipe so you should have a fire extinguisher close at hand (actually always a good idea in a kitchen).

1 pear
1 heaping tbsp brown sugar
1 tbsp butter
1 oz Grand Marnier
1 small wheel of brie

Put the brie in a ramekin or brie baker or oven safe frying pan that's just larger than the wheel itself and set aside.

Peel the pear and cut it into thin slices discarding the core.  In a frying pan just large enough to hold the pears melt the butter over low hear and layer in the pears.  Cook until the pears become soft, add in the brown sugar, turn the heat up to medium and stir until the sugar has all dissolved.

Light a match or a BBQ lighter and have it at the ready.  To avoid unwanted heart attacks and volunteer fire efforts, warn everyone that there's going to be some flames and get them to stand back.  Pour in the Grand Marnier and light.  The flames should subside after ~10 seconds at which point pour the pears and delicious sauce over the top of the brie and place in a 300F oven for 5-10 minutes (just long enough to melt the brie but not turn it liquid).

Serve with slices of baguette or crackers and glasses of port.


I don't know the scientific explanation but fire made it good!
- Homer Simpson

Monday 21 November 2011

From the kitchen of my "Indian Mama" - Chicken Curry

It is now time for the second installment of the series 'From the kitchen of my "Indian Mama"'  the recipe - chicken curry.  Now you may have had curry before, but not quite like this. This curry is especially delicious as it incorporates Indian spices along with coconut milk (which one might normally associate with a Thai-style curry) and ground almonds which help to mellow the spiciness of the chillis.  This recipe is solely with chicken (no veg), I like to serve this with steamed green veggies and rice on the side.  However, if you want veggies in the curry with the chicken, I would incorporate any mix of veggies (cauliflower, eggplant, zucchini, peppers, etc.) just after adding the sauce and bringing to a simmer. Adding veggies at this stage should cook them just enough so they are tender, but have not yet overcooked.

Serves 2 with enough left over to pack for lunch

1 large onion, cut in 1cm thick rings, then sliced in half
6 chicken thighs, boneless, skinless
salt and pepper to taste
3 Tbsp coconut oil, or vegetable oil (divided)
2 Tbsp ginger-garlic paste (recipe to follow) *You may also find this jarred in the ethnic aisle of your grocery store
1 Tbsp garam masala
1/2 tsp turmeric
1/2 tsp ground red chilli, or cayenne pepper
1/2 tsp salt
2 cardamom pods, crushed to release inner seeds
pinch of saffron threads (about 6-8 individual threads)
1/2 cup plain yogurt *Do not use non-fat or Greek yogurt, when heated it will separate and not thicken the sauce
1/2 cup coconut milk
2 Tbsp ground almonds
1 small fresh green chilli, minced to garnish (optional)
1/4 cup fresh cilantro, chopped to garnish

Chicken Curry

Rinse chicken thighs with cold water and pat dry with a paper towel, making sure to get all water off chicken. Salt and pepper the thighs and set aside.

In a large skillet with a lid, heat 1 Tbsp of coconut oil on medium-high heat and add sliced onions, do not add any salt.  Fry onions until browned edges and slightly crispy about 8 minutes. (looking for high heat here, not low and slow like you would for caramelized onions). Remove onions from skillet, and reserve.

Add another Tbsp coconut oil, to pan to heat,  once skillet is hot add chicken thighs and brown on both sides, about 2 minutes per side.  Remove from the pan and set aside. 

Add the last Tbsp oil to the skillet,  turn the heat to medium and add garlic-ginger paste, garam masala, turmeric, red chilli, salt, cardamom pods and saffron.  Cook spices for 1 minute, then add the chicken thighs back into the skillet.  Once chicken has been added back to spices, add yogurt, coconut milk and ground almonds and bring up to simmer.  Place lid on the skillet and turn heat to low, and simmer 10-15 minutes. Finally, stir in reserved onions and serve.  Garnish with fresh green chilli and cilantro to your liking.

Ginger-Garlic Paste

1/2 cup whole garlic cloves, peeled
1/2 cup fresh ginger, peeled and cut into small pieces
1/4 cup vegetable oil

In a small food processor, combine garlic, ginger and oil.  Puree until smooth, or until there are no large pieces of garlic or ginger left - there will be some coarseness, as the ginger is fibrous.  This paste can be kept in the fridge for about 2-3 weeks.

Saturday 19 November 2011

Ginger carrot soup

Gingers are hot! Also, ginger is hot. It imparts  a more delicate heat than chili peppers and compliments the sweetness of the carrots perfectly. Serve with a dollop of creme fraiche or Greek yogurt to smooth it all out.

Makes 8-10 servings
1 tablespoon grapeseed oil
1 large onion, diced
3 tablespoons ginger, minced
2 cloves garlic minced
4 large carrots, roughly chopped
1 litre chicken stock
2 tablespoons red wine vinegar
1 cup water
salt and pepper to taste
Creme fraiche or Greek yogurt to serve

Heat the oil in a large soup pot over medium-high heat. Add the onions and give it a stir. Cook for 1-2 minutes until translucent. Add the ginger and garlic and stir. Cook for 2-3 minutes more.

Add the carrots and stir. Cook for 2-3 minutes just to heat them through then add the stock and 1/2 cup of water (note: most chicken stock comes in 1 L containers but if you have more on hand, feel free to use stock in lieu of water). Simmer on medium for 15-20 minutes or until carrots are soft. Use an immersion blender and blend the soup thoroughly until smooth. Alternatively, you can use a blender to puree the soup in batches. Return to the pot once smooth.

Add the vinegar and stir. Taste the soup and add salt and pepper as required. At this time you can add some more water if necessary to thin the soup out.  Serve with a dollop of creme fraiche or Greek yogurt in the centre of each bowl.

Friday 18 November 2011

Thyme and raspberry prosecco

It's official, the holiday season is upon us. The muzak in my office elevator is has switched from Kenny G to Kenny G's Holiday Favourites, the stores are filled with shiny festive holiday attire, and, most importantly, the holiday party invites have started to roll in. This drink is a perfect compliment to the holidays, whether you're hosting a party or just need to relax with a cocktail after a long day of trying to find a parking space at the mall.

Cheers!
This is a subtle and slightly sweet addition to  Prosecco or sparking wine. Save the Veuve for sipping, for this cocktail the $12 Prosecco will be just fine. The leftover syrup is also tasty with ice cream and poached pears.

Cocktail:

1 bottle Prosecco or sparkling wine
Raspberries and fresh thyme sprigs for garnish
Raspberry thyme syrup (below) 
Raspberry thyme syrup:
2 sprigs fresh thyme
1 container raspberries
1 cup water
1/3 cup sugar

To make the syrup, combine all ingredients in a saucepan over medium-low heat and bring to a simmer, stirring to dissolve the sugar. As the berries soften, crush them with a fork. Let simmer for about 10 minutes until the syrup begins to thicken. Remove from heat and press through a mesh strainer to remove the seeds. Let cool.

Drop a sprig of thyme and a raspberry in a champagne glass. Pour in about 1 inch of syrup. Top with Prosecco and serve.

Wednesday 16 November 2011

Peanut Butter Cups...

I have mixed emotions about sharing this recipe with you and encouraging you to go and make these on your own. Sure the pictures look great, you say, but what you aren't seeing is the disastrous kitchen mess resembling that of a chocolatey Jackson Pollock and the multiple 'smash modes' (my version of a hissy fit) that occurred while making these.  However, this is a blog about the MISadventures of cooking so I guess it is my moral obligation to tell you the tale of these chocolate peanut butter cups.  

My first million dollar idea was to use small confectioners cups.  These cups were so tiny that getting the chocolate into each nook and cranny was very tedious and time consuming. The cups, being small and flimsy, kept slipping out of my hands and every time this happened I let out a disgruntled sigh. After about the fifth time my sighs turned to yelling and muttering obscenities in frustration as chocolate was spraying all over me and the kitchen.  Yet I pressed onward and two T-shirt changes later, which would have been three until I had the bright idea to put on an apron, I was back on track: chocolate cups coated and into the freezer.

Next I mixed up the peanut butter mixture, no problems there. 

Then came the filling: with chocolate cups at the ready, I began piping small amounts of peanut filling into the cups. Annoyingly the seam of the Ziplock piping bag burst, sending a wave of gooey peanut butter down my hands and cascading over my precious little chocolate cups and onto the counter. At this point, it was just too much - more obscenities, yelling, tears of anger starting to squeeze from my eyes (a full on 'smash mode' if there ever was one). Luckily, before I just about dumped the whole plate of cups into the sink, my boyfriend who had been watching this whole production go down swooped in to calm me (this may have been a self serving act on his part to save the chocolate cups and ensure dessert for later).  After a 2 minute breather I was back at it racing to finish up with no further complications and, as you can see, the results turned out quite well.

So if you love chocolate, peanut butter and tedium, this is definitely the recipe for you!

Makes 36-40 peanut butter cups

40 confectioners size baking cups
1 large piping bag or Ziplock bag
3 100g 70% Lindt chocolate bars, broken into pieces
1 tbsp coconut oil
1 cup natual peanut butter
1/3 cup icing sugar, sifted
1 tsp butter, room temperatue
pinch of salt

Seperate baking cups, and arrange on a flat tray, that can be transferred into the freezer.

In a double boiler, melt chocolate and coconut oil and gently stir until smooth. Once melted, keep chocolate in double boiler on very low heat. 

Place small spoonful (~1/2 tsp - 1 tsp) of chocolate into a baking cup, twist and rotate cup until all nooks and crannys of the paper cup have been coated.  Place back on tray and repeat with all baking cups.  Once all cups are coated, place the tray of cups into the freezer for about 10 minutes to set the chocolate.

While cups are chilling, mix peanut butter, icing sugar, butter and pinch of salt in a bowl.  Once mixed, place into piping or Ziplock bag (if using Ziplock push mix into one corner, then cut off the corner of the bag).

Remove cups from freezer, and pipe peanut mixture into the centre of the chocolate cups. Leave some space around the edge of the peanut mixture so that when you fill with chocolate, it will surround the peanut mixture like a moat - doing this will help to build up the width of the side wall.

Once all cups are filled with peanut mixture, spoon over reamining melted chocolate to fill up 'moat' and cover peanut mixture entirely.  Once filled with chocolate, return tray to fridge and chill for at least 30 minutes.

Enjoy! (bonus points if you did it with no kitchen catastrophes)
Note - If you want a more substantial PB cup, small baking papers (think, mini cupcake size) would likely also work well.
 

Tuesday 15 November 2011

Ginger and lemon spiced apple cider


Every time I drink this cider I am transported to a crisp, sunny, winter day. In this daydream I'm at the cottage and have just come in from a brisk snowshoe. My cheeks are rosy and my fingertips are cold. As I try to warm them up, Adam hands me a mug of hot cider and winks. Of course I know the wink means he's added a splash of rum, God bless him. Then he suggests I sit by the fire and put my feet up while he finishes cleaning the bathroom, folding the laundry, and doing my taxes. Ahhh one can dream...

Makes 4-6 servings

6 cups apple cider (not apple juice)
1 cinnamon stick
3-4 cloves
1 lemon, peeled and juiced
2 inch piece of fresh ginger

Slice the ginger into thin slices and prick each with a fork to help release the juices. Combine all the ingredients in a large pot over medium-high heat and bring to a simmer. Reduce the heat to low and let simmer gently for 10-15 minutes to allow the flavours to blend. Serve in mugs. Feel free to add that splash of rum to your mug!

Roasted winter squash and walnut ravioli with sage brown butter

Now that you've memorized the pasta dough recipe we featured yesterday, we thought we'd follow up with a delicious recipe to showcase the dough as well as some seasonal fall ingredients.  Don't be afraid to make dough from scratch. It's basically like playing with play-dough except you can eat it (without getting in trouble). This recipe makes about 5 dozen ravioli. If you have leftover filling you can freeze it or save it in the fridge for about a week. The sauce is enough to coat about 2 dozen ravioli, or 3-4 servings.

If you're looking for variations, Sortachef makes one with chanterelle mushrooms. He even roasts his squash in a wood-fired pizza oven! Now where can I get one of those... 

For the filling: 
3 small winter squash
drizzle of olive oil
1/2 cup water
1 egg
3 cloves garlic
300 g container ricotta cheese
1 cup grated Parmesan cheese
pinch of freshly grated nutmeg (about 1/4 tsp)
1 tsp salt (or more as needed)
pepper to taste
2 tsp walnut oil
1 cup toasted walnuts

For the dough:
See our previous post for the pasta dough recipe

For the sauce:
3 tablespoons butter
8 sage leaves
1/4 cup reserved pasta water
1/2 cup toasted walnuts, roughly chopped
Parmesan cheese


Preheat the oven to 350F. Cut squash in half and remove seeds and drizzle with oil. Lay cut side down on a rimmed baking sheet lined with parchment paper. Add about 1/2 cup of water. Roast for 1 hour until the skin can easily be pierced and the squash is tender. Let cool.
Pulse the walnuts in a food processor until finely ground. Transfer to a bowl. Scoop squash out of the skin and into the food processor. Add the egg, garlic, ricotta, Parmesan, nutmeg, salt, pepper, and walnut oil. Puree until smooth. Combine with the walnuts and adjust the seasoning as required. 

Roll out the pasta dough into sheets using a pasta roller or rolling pin. If using a pasta roller I usually stop one setting short of the thinnest as I find otherwise the dough is too thin and will tear. Use your judgement as every pasta roller is different. Try to make the sheets as even as possible. Place them on a sheet of parchment paper to prevent them from sticking to the counter (this method seems to work better than flouring the surface of the counter). 

Evenly space 1/2 tablespoon dollops of the filling onto one sheet of dough. Each spoonful should be about 1 1/2 inches apart.  Lay a second sheet of dough over the first and gently press down around the filling with your fingertips to remove any air pockets and seal the dough. Use a pasta wheel or sharp knife to divide into individual ravioli. Be sure to leave at least a 1/2 inch border around each ball of filling. 

Melt the butter in a large pan on medium heat. Tear the sage leaves into pieces and add them to the butter. Heat the butter and sage mixture until it is lightly browned and smells nutty. 

In the meantime, add 2 dozen ravioli to a large pot of salted, boiling water. Gently stir. Let cook until the pasta is al dente, about 5 minutes. Remove from the pot with a slotted spoon. Transfer to the pan of butter and sage along with 1/4 cup of the pasta water and the toasted walnuts. Toss to coat and serve with a sprinkle of grated Parmesan. 

Occasionally a few of the ravioli will burst when cooking. Don't fret! This is pretty standard. You can serve these ravioli casualties to the people you don't like. 


Monday 14 November 2011

Weekday eggs

Legend has it that the actor Bela Lugosi played Dracula in his first American film role and was forever typecast as a villain there after.  It's not true (he played several roles before being nailed into the Dracula coffin for the rest of his career) but it's a nice story that illustrates the pitfalls of early success and prejudice, much as has happened to eggs.

Atkins diet adherents aside, most of us feel that eggs are a weekend only kind of meal which is a huge shame because they really don't take any more time than cereal and they're a whole lot more satisfying.  I'm a huge proponent of a fried egg over pea shoots or on toast with a bit of truffle salt and perhaps some avocado.  The whole thing takes about 5 minutes to make and starts your day off with a solid dose of protein and fiber that will keep you full until lunch.  No matter how hard they try, Count Chocula and Cap'n Crunch are just never going to be able to deliver what a solid fried egg can.

1 egg
1 tsp butter or canola oil
1 slice of whole wheat toast
small handful pea shoots or arugula
pinch of truffle salt (if you don't have any, close your computer and go buy some right now.  You can thank me later)

Heat oil in pan over medium heat.  Crack egg over the pan and cook for 2 minutes, flipping once in the middle.  Serve on top of greens, avocado and toast and sprinkle a pinch of truffle salt over top.  If you are cooking these on the weekend then pair with duck fat potatoes as in this picture.

Sunday 13 November 2011

Basic pasta dough


Italians will tell you that there's no substitute for fresh semolina pasta and once you've tried it you'll realize that while they've never won a war or mass produced a decent car, in this, they are correct!

Makes 6-12 servings depending on how hungry you are

3 1/2 cups semolina flour
4 extra-large eggs
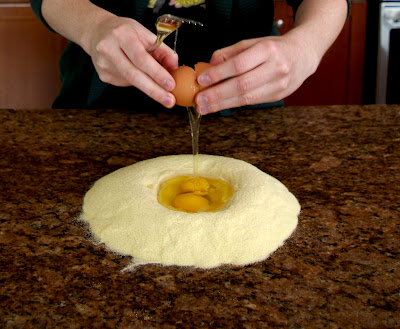
Mound the flour in the center of your counter or a large cutting board. Make a well in the middle of the flour. Add the eggs. Using a fork, gently beat together the eggs while slowly incorporating the flour.  It will start to get messy.

Once you've incorporated about half the flour, begin kneading the dough with both hands.  If the dough is too dry, sprinkle with a bit of water but be careful not to add too much or the dough will turn to glue. Once all the flour is incorporated into one mass, continue kneading for 3 more minutes.  The dough should be elastic and just a little bit sticky. Continue to knead for another 3 minutes, dusting your surface with flour as necessary to prevent the dough from sticking.  Wrap the dough in plastic wrap and set aside to set for 20 minutes at room temperature.

Roll and shape as desired.

Saturday 12 November 2011

Crispy duck breast with fig and port sauce


In an effort to impress Taryn's parents, I cooked this the first time I ever made them dinner.  I chose it not just because it's relatively easy to make , presents beautifully and tastes amazing but because people in English Canada rarely seem to eat duck and almost never do so outside of a restaurant (in Quebec you can buy duck at the IGA but they're more enlightened when it comes to food) so I thought it might be different and unexpected to get it at home.  I'm tempted to blame the war on fat for our general lack of duck-home-cookery as it's fantastically rich, however, I don't think duck was a staple of many English Canadian households even before the war started which is a shame.  Duck is a fabulous meat that is surprisingly versatile.  It stands up well to deeper flavours such as those in this recipe that wouldn't go well with beef and would overwhelm chicken and it can be cooked in a wide variety of ways.  Of all the ways we prepare duck I think this is my personal favorite.

Makes 2-3 servings:

1 duck breast
3 large figs, two of them diced, one of them quartered
1 shallot minced
2 cloves garlic, minced
1 large bunch of arugula washed and stems removed
⅓ cup walnuts or pecans
½ cup ruby port
⅓ cup duck, veal or other light stock
4 tbsp balsamic vinegar
⅓ tsp each of ground allspice, black pepper and salt
1 tsp butter


Slice through the skin and fat but not the meat of the duck breast in a cross hatch pattern.  This will allow the skin to shrink without deforming the breast and let the fat render out.  Mix the spices together and rub them into the skin side of the duck.

Place the duck skin side down in an oven safe pan over medium low heat and cook until almost all of the fat has rendered out (10-15 minutes or so).  You’re only looking to crisp the skin and get rid of the fat, not to cook the whole duck breast.

While duck is cooking, add balsamic vinegar to a small frying pan or sauce pot and bring to a simmer.  When the vinegar is reduced by 2/3rds and starts to thicken, add in the walnuts, stir to coat and remove from heat.

When most of the fat has rendered from the duck, drain off the fat (reserve for another use), flip the breast over and put in oven at 400F until the duck reads ~130 on a thermometer (10 minutes or so).  It should be pink when cut and resemble medium rare steak.  Remove the duck to a plate and let rest covered in foil or another plate.

To make the sauce, drain off all but 1 teaspoon of the remaining duck fat from pan, add in the shallots, garlic and diced figs and saute over high heat until the shallots are soft.  Add in the port and stock and simmer until reduced by half.  Strain the liquid through a fine mesh sieve to remove shallots and figs and continue to simmer the liquid until reduced by half again.  Stir in butter and remove from heat.

Put arugula on plates, sprinkle with the glazed walnuts.  Top it off with 2 or 3 slices of duck and drizzle with sauce, garnish with quartered figs and serve.

Friday 11 November 2011

'Guiltless' Macaroni and Cheese

This recipe is inspired by Cooking Light Magazine. It is quite simply, delicious and lessens the guilt-factor when you dig in for a second helping. Butternut squash is used to create a creamy base, instead of a rich bĂ©chamel traditionally thickened with butter and flour. The interesting thing that I learned when preparing this recipe is that one can get ‘AHHH...butternut squash hands!!!’ this is what I refer to as hands, that get dry, tight, and are covered with a yellowish residue no easier to remove than dried cement. The internet described this as the squash's ‘self defense mechanism’ self defense, from who? What me?!? I just want to eat the delicious thing… Anyway, the squash exudes a sap when it is wounded to dry out the exposed flesh and seal it off to prevent further infection or damage, for example if it was attacked by some critter in the squash patch. So, note to ‘selves please wear some gloves when you peel and cut your butternuts to avoid ‘AHHH…butternut squash hands!!!’

Serves 8…but really 4-6

3 cups peeled and cubed butternut squash
1 ½ cups low sodium chicken broth
1 ½ cups 1% milk
3 cloves garlic peeled
1 tsp salt
Fresh ground pepper
½ tsp fresh grated nutmeg
2 tbsp fat-free Greek yogurt
1 ½ cups shredded Gruyere cheese
1 cup grated pecorino Romano cheese
1 pound pasta (Cavatappi or Rotini work well)
1 tsp olive oil + more for drizzling
½ cup panko breadcrumbs
2 tbsp grated Parmigiano-Reggiano cheese

Preheat oven to 350 degrees F, bring large pot of salted water to boil and grease a 9x13" baking dish.
Combine squash, broth, milk and garlic in a pot and bring to boil over medium heat. Reduce heat to mid-low heat and simmer until squash is tender, about 20-25 minutes. Next place the hot squash mixture in a blender (will have to do in 2 batches) and blend until smooth. Place blended squash mixture into a bowl and stir in salt, pepper, nutmeg and Greek yogurt. Then stir in Gruyere and pecorino Romano. Set aside.

Add pasta to water. While pasta is cooking, add 1 tsp olive oil to pan on medium heat then add breadcrumbs and cook until breadcrumbs are golden, remove from heat and set aside.

Once pasta is cooked, drain and stir into reserved squash and cheese sauce. Pour entire mixture into baking dish and sprinkle with toasted breadcrumbs and Parmigiano-Reggiano cheese. Bake for 18-20 minutes until bubbling.

Serve as is, or with a shot of hot sauce or spicy peppers!

Thursday 10 November 2011

Mustard crusted prime rib roast


When you cook a lot you tend to accumulate condiments.  For example, right now we have 6 kinds of mustard in our fridge.  This might not be normal and may signal the early stages of hoarding disorder but it can have delicious consequences!

1 prime rib roast (king of beef roasts!)
~3-5 tbsp mustard/mustards (get a bit of honey mustard in there for sweetness and some grainy ones for texture)
1 tbsp grape seed or olive oil
2 tbsp finely chopped herbs (mix of thyme, rosemary, sage, lavender)
1 tsp salt
1 tsp cracked black pepper
½ tsp garlic salt
1/4 cup gingerale
1/3 cup red wine

Pre-heat the oven to 450F.  Add the mustard, herbs and spices to a mixing bowl and stir vigorously while adding oil in a slow stream until it becomes silky (like a mustard mayonnaise).  Coat the beef all over in the mustard paste and let sit while you prep and start the veggies and the meat comes to room temperature (15-20 minutes).

If you're making roast veggies along with it, this is the time to quickly prep them and get them going.  I STRONGLY recommend pairing this with roast potatoes such as those outlined in an earlier post

If roasting meat and veggies in the same pan, lay the veggies down and prop the roast up on top of some of them.  Cook for 20 minutes at 450F, then turn down to 350F and continue until meat thermometer placed at the centre reads ~130-140F (usually about an hour and a half for a 5 person roast).  The rule of thumb is 15 min per pound after that initial 20 minute searing but I find it varies greatly by oven, pan size and the density/fat content of the meat, so watch the thermometer carefully.

Once the meat is done remove it to a platter and cover with foil to rest and remove the veggies to serving platters.

Pour the pan juices into a fat separator or if you don`t have one, use paper towels to mop up the oil.  Then strain them back into the pan along with the wine and gingerale.  Put the roasting pan on the stove and bring the juices to a boil.  Dissolve a tablespoon of flour in a half cup of cold water and then add it into the pan to thicken the sauce.

Carve, serve and enjoy!

Wednesday 9 November 2011

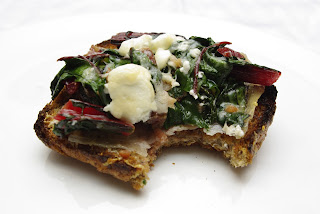
Toast with garlic greens, prosciutto and goat cheese


What's that you say? Greens are bland and tasteless? Only suitable for human consumption as part of some kind of torturous spa food diet?

Not true! I know they're a tough sell for many but it's my mission to make you green-haters out there love them too.

Dedicated blog followers may have noticed the Salt and Pepper Kale Chips recipe that we posted last week. I'm dubbing that Part 1 in our Eat Yer Greens series; this is Part 2. The conversion process from green-hater to green-obsessed is simple: follow the recipes, eat, enjoy, thank me later.

Kale, Swiss chard, spinach, beet greens - they're all cheap, hearty, and incredibly good for you. They're also delicious, provided you don't boil them to death (here's a tip: if the water is greener than the vegetable, you've gone too far). I prefer to braise, saute, or blanch them or even eat them raw in a salad. This dish is quick and easy to prepare and makes a great lunch or light supper. It would also be a tasty brunch dish with a fried egg on top. Avoid pre-sliced sandwich bread as it tends to be too soft and instead opt for thick slices of crusty multigrain or sourdough.

Makes 4 servings

8 slices of bread
2 cloves garlic, minced
2 bunches of Swiss chard
1 tablespoon water, as needed
Pinch of salt and pepper
4 slices prosciutto, cut in half
3 tablespoons goat cheese
Sprinkle of freshly grated Parmesan cheese

Turn the oven on to broil. Remove the tough ends of the chard, usually the bottom 2 or 3 inches, and discard. Roughly chop the chard into 1-inch pieces. Heat a drizzle of oil in a pan on medium-high heat. Add the chopped garlic and let cook for a few seconds, then add the greens. Season with a pinch of salt and pepper and stir. Reduce the heat to medium. If the pan seems too dry, add a sprinkling of water (no more than a tablespoon). Cover with a lid and cook for 5-7 minutes until the chard is wilted and the stems are tender.

While the chard cooks, place the bread slices on a baking sheet and lightly toast under the broiler for a minute or two. Keep an eye on them as they will burn quickly. Flip and toast the other side.

To assemble, place a half-slice of prosciutto on each piece of toast. Add a small pile of the cooked chard. Crumble the goat cheese on top and sprinkle with the grated Parmesan. Return to the broiler for another minute or two until the cheese is melted and golden.


Monday 7 November 2011

Port Wine Sauce

This is a very simple sauce recipe that goes well with any roasted meat. However, I think the slight sweetness of the orange juice makes this sauce best when drizzled over a herb roasted pork tenderloin.

3/4 cup Port wine
1/2 cup orange juice
1 cup reduced sodium chicken broth
1 tbsp soy sauce
1/4 cup whipping cream

Place Port wine, orange juice and broth in a small pan or pot.  Boil until the liquid has reduced to about 1 cup.  Stir in soy sauce and whipping cream, and bring back up to simmer, and reduce slightly until just thickened.

Sunday 6 November 2011

Momos


When shopping for food, my eyes are usually bigger than my stomach and as a result, I am often left with large amounts of leftovers.  Momos, or Tibetan dumplings, are a dish my brother introduced to me after he spent some time there several years ago and they have since become one of my chief left-over vehicles because they are simple to make and freeze really well.  When using momos to address left-overs, I'm not a purist and will deviate completely from Tibetan spices and seasonings as my left-over resources dictate.  I've made versions with sweet BBQ chicken filling as well as spicy Mexican adobo pork and they're always fantastic.

Makes 12-18 momos

Filling
1 cup left-over beef or pork
1/2 cup chopped scallions
2 teaspoons chopped red chilis
1 tablespoon hoisin sauce or other sauce

Wraps
2 cups flour
1 teaspoon salt
1/2 teaspoon baking soda
1/2 cup warm water

To make wrappers, mix the dry ingredients in a bowl and then mound the mixture up on a clean surface.  Make a well in the middle and begin to add in water while mixing thoroughly.  When the dough starts to firm up, set aside to rest under plastic wrap for 20-30 minutes.  Alternately, you can put the dry ingredients into a food processor with a dough blade or a stand mixer and add the water slowly.

To make filling, chop or shred left over meat in a bowl, add scallions chilis and hoisin, mix thoroughly and set aside.

Cut dough into pieces about the size of half a ping pong ball and roll into circles 4-5" across.  Heap in about 1 tablespoon of filling and twist dough at the top to create dumplings.

If freezing, dust momos with flour and put in an airtight container, separating layers with wax paper. When cooking,  oil a steamer basket and the dumplings and steam for 5-10 minutes.

If you like crispy dumplings then fry the steamed momos in a bit of peanut and sesame oil to crisp them up. Serve with chili sauce.

Honey pepper popcorn


When I worked at my first job after university there was a woman in the neighbouring cubicle who occasionally made microwave popcorn for her afternoon snack. I have nothing against real popcorn but she was a fan of the bright yellow kind that smells vaguely like feet and contains “butter-like flavor agents”. Every time she would make it I’d be forced to vacate my cubicle until the smell subsided.  This catastrophic drop in productivity surely cost the company millions.  I have since realized that there are two kinds of people in every office: those who love the smell of artificial soy-based popcorn coating and those who can’t function in its presence.

I believe humanity can do better, which is why we came up with the recipe below. Popping corn on the stove top is shockingly simple and takes almost the same amount of time as the microwave. You can eat it plain but we prefer the sweet/salty/zesty combination of honey, salt, and cracked black pepper. I also occasionally make a lime and chili version that I will tell you about later if you keep reading our blog.

1/3 cup plain popping corn*
1 tbsp canola oil, just enough to coat the bottom of the pot
2 tbsp liquid honey
A generous pinch of salt and pepper

Coat the bottom of a large pot with oil. Heat on medium-high for 30 seconds and then add the corn. Cover with a lid. Once you hear the kernels begin to pop, gently shake the pot while holding the lid on. Emphasis on gently. Double emphasis on holding the pot lid. You can lift the lid slightly to allow steam to escape but resist the temptation to remove and look inside. When the popping slows down, remove from heat. While the popcorn is still warm, drizzle with honey, sprinkle generously with salt and pepper and toss to coat.

*It's no surprise that Orville Redenbacher's popcorn kernels seem to yield the best, fluffiest popcorn. The man knew popcorn. 

The world's best roast potatoes

In this era of carbo-consciousness, there may be nothing more inappropriately delicious than a perfect roast potato.  My grandmother has always made amazing roast potatoes and for years I tried to re-create them with disastrous results until finally giving up.  These likely aren't your grandmother's roast potatoes (hell they aren't even mine) but I swear they're as close as you'll come.

The secret, as with so many things in life, is duck fat.  While you could use vegetable oil or another fat with a high smoke point, none of them add the flavour or pretension that comes with duck fat.  I make a lot of duck so I've always got mason jars and cereal bowls full of the stuff (honestly, it's kind of gross), but you can also buy it if you don't have any already saved.

The other key is to use a starchy potato, but not too starchy.  Russets, aka baking potatoes, are too starchy. Blue potatoes, aka boiling potatoes, are too waxy.  I use Yukon gold potatoes but frankly, you can just look at the label on the bag or in the store and if it says "good for roasting" or words to that effect then you should be good to go!

1 potato per person, peeled and halved
1 tablespoon duck fat per potato
1 can beef or chicken stock

Heat duck fat in the oven at ~400 in a roasting pan. While fat is heating, put the potatoes into cool water to cover, add stock and bring to a boil.  Cook until potatoes are par-boiled where the outsides start to become soft but the insides are still hard.  The stock will impart a bit more flavour if desired and can be left out if desired.

When potatoes are soft on the outside, drain the liquid, put the lid on the pot and shake it like a Polaroid picture* until the outsides of the potatoes get all roughed up. This will make them extra crispy and helps to burn off the carbs you're about to consume.

Add the potatoes to the fat, tossing to coat and put in oven for 30-40 minutes rolling around once in the middle.

Let cool for ~5 minutes and then serve.  Goes well with just about anything (I'd put them on my cereal if it were social acceptable).


* Polaroid does not endorse the shaking of their film to aid the development process.  Doing so may result in smeared or blurred pictures but is one hell of a dance move.

Friday 4 November 2011

From the kitchen of my "Indian Mama" - Lentils

Well I first have to start by saying I am not the daughter of an Indian mother. However this recipe comes from a lovely woman, who I would be happy to call as such.  She has introduced me to a variety of different recipes and new taste sensations. 

This recipe will be the first installment of a series I will call 'From the kitchen of my "Indian Mama"'.  Lentils are a great high protein alternative to meat with about 30% of their calories coming from protein. Serve these lentils with steamed rice,   greens perhaps a paratha or chapati and you have a complete meal.

Serves 6-8

1 tbsp coconut oil (coconut oil is good for high heat - but vegetable oil will do just fine)
1 onion chopped
1 1/2 tbsp grated or minced ginger
1 1/2 tbsp minced garlic (about 5 cloves)
1  tsp 'haldi' aka turmeric
1 1/2 tsp garam masala
1/2 tsp red chilli or cayenne
1/2 tsp salt
1 large tomato chopped
2 cups red lentils
water
fresh coriander to garnish

In a large skillet or pot with a lid, heat oil over medium high and add onion.  Cook onion until soft and translucent about 8 minutes.  Add ginger and garlic and cook 2 minutes.  Next add turmeric, garam masala, chilli and salt, cooking another minute.  Then add tomatoes and cook for 5 minutes or until tomatoes are soft.  Next add lentils, stir so that all the lentils are coated, then add enough water to just cover.  Cover with lid and simmer on low heat for 20-30 minutes until the lentils are tender and the sauce has thickened.  Serve with fresh coriander to your taste.

Thursday 3 November 2011

Mashuganuts


Mashuga is the Yiddish word for crazy and while I'm neither Yiddish nor crazy (don't listen to my boyfriend), I'm pretty Mashuga for these nuts.  They're sweet, salty, and a little bit spicy. They're also completely addictive.

I like to use a mixture of raw almonds, walnuts, and pecans but you can use whatever nuts you're Mashuga for.

2 cups raw mixed nuts
2 tablespoons unsalted butter
1/4 cup brown sugar
1 tablespoon chopped fresh rosemary
1 teaspoon chili flakes
1/2 teaspoon cinnamon
pinch of salt and pepper

Preheat the oven to 375°F and line a large baking sheet with parchment.

In a medium  saucepan, combine all the ingredients except the nuts. Heat on medium until the butter melts and the sugar dissolves. Remove from the heat and add the nuts, stirring to coat.

Arrange evenly on the baking sheet. Bake for 10-12 minutes until the nuts are fragrant and toasted, stirring occasionally. Be careful not to leave them too long or the nuts and sugar will burn. Let cool before serving. Seriously, let them cool, these babies will be hot.

Wednesday 2 November 2011

Salt and Pepper Kale Chips


I was first introduced to kale chips by my friend Julie, and my initial thought was 'you have to be kidding me'. Now don't get me wrong I like kale a whole lot. But, the idea of putting a leafy green vegetable into a hot oven to yield a potato chip-like result had me thinking that this was an idea thought up by mothers, desperate to trick children into eating their greens. However, I was proven wrong. So, if you are looking for something to satisfy your salty craving, search no further. These kale chips are suspiciously tasty and make you wonder if eating your greens in snack form could be the new way to go. 

Below you will find the recipe for Salt and Pepper Kale Chips, but you can also combine other seasonings before baking; Salt and Vinegar, Chili Powder, Parmesan cheese, etc.


 1 bunch of curly green kale
                                     1 tbsp olive oil
                                     1/2 tsp salt
fresh ground black pepper


Preheat oven to 375 degrees F.
Remove ribs from the kale and tear leafy greens into medium sized pieces (a bit larger than you would tear lettuce for salad). Wash and dry the leafy greens (a salad spinner works best). In a large bowl combine kale and the olive oil, and with your hands massage the olive oil onto each leaf, getting into every crinkle.
Once the kale is well coated, sprinkle with salt and add fresh cracked pepper to your taste. Toss all together. Tumble all the kale pieces onto a large baking sheet (pieces will be overlapping). Bake in oven for 15-20 minutes tossing once after about 10 minutes. Kale chips are ready when they are light and the edges are browned and crispy.
Note, the chips have not baked long enough if the kale is still slightly heavy and limp in the centre.