Google Translate

Saturday 31 December 2011

Prosecco gelee

Happy New Year's Eve! As the name of this post suggests, we're celebrating the dawn of 2012 with some bubbly. Of course I wasn't content to let bubbles be bubbles so we're mixing it up a bit. Let's be frank - this is nothing more than an upscale jello shooter. This version can be served in shot glasses if you want a posh throwback to your university days or if you're bringing this to a New Year's Eve party. Alternatively, you can let it set in teacups or ramekins and serve it with berries or sorbet.  If you want to sweeten it up, add a tablespoon or two of sugar to a little warm water to dissolve and combine with the wine. Reserving some of the sparkling wine to top up the gelatin mixture helps keep some of the bubbles intact.

1 750 ml bottle of Prosecco or sparkling wine
2  packets gelatin (28 mg each)
1/2 cup water

Pour the water into a small saucepan and heat on high until it begins to simmer. Sprinkle the gelatin over top. Remove from heat and whisk until the gelatin dissolves, about 2 minutes. Transfer to a large mixing bowl. Pour 1/2 of the bottle of wine into the bowl, reserving the other half. Don't be alarmed, it will fizz up. Whisk vigorously for a couple of minutes to make sure all the gelatin is incorporated. Add the rest of the bottle and gently stir to combine. Pour into shot glasses or other mold and refrigerate until set, about 2 hours.

Friday 30 December 2011

Diner style grilled cheese

Ever wonder why diner grilled cheese is so awesome?  The secret is mayonnaise ... on the outside!

I learned this from someone at a cocktail party and it has literally changed my life forever, or at least the grilled cheese making part of my life.

The explanation is that the oil in the mayonnaise will fry the sandwich and the proteins in the egg will crisp up to create the perfect diner crunch.  This is why you have to use real mayo.  If you mistakenly use Miracle Whip or other food products made by the good folks at Exxon then your sandwich will more closely resemble the cleanup tools from the gulf oil spill than anything likely to come out of Flo's Diner.

I'm not going to bother with ingredients or instructions as if you need them then you probably shouldn't be using a stove or a knife.

Wednesday 28 December 2011

Beer braised kale ravioli

Kale is one of the "super foods", so called because of the amount of vitamins and minerals that it contains as well as the fact that it confers an immunity to kryptonite.  We came up with this recipe as a new way to present this delicious veggie and it became a staple in our house from the first time we cooked it.  The filling is an amazing combination of savoury flavours (I could eat it by the bowlful if such things were socially acceptable) but requires a delicate sauce that won't overpower the kale.  I find the dish goes best with a simple white wine sauce or beurre noisette and sage sauce as in the recipe for winter squash ravioli.

Makes about 3 dozen ravioli


1 bunch of kale, washed and tough ribs removed
4 cloves garlic, minced
4 slices bacon chopped into lardons
2 shallots or 1 cooking onion, diced
1 tbsp olive oil
1 bottle of beer
1 cup grated parmesan cheese
3 tbsp ricotta cheese
salt and pepper to taste
Pasta dough, rolled into thin 6"x12" sheets (this  also works well with store-bought wonton wrappers if you're in a rush)

Place the bacon in a large frying pan and turn the heat to low. Starting the bacon in a cold pan seems to yield crispier results.  In a large pot, saute the garlic and shallots in oil over medium high heat until shallots are translucent and the garlic has softened. Add in kale and beer and stir.  Turn heat to medium low and cover.  Simmer for 15-20 minutes or until liquid is almost gone. Remove lid, turn heat to high and cook off remaining liquid while stirring.  Season with salt and pepper to taste. Remove kale from heat and let cool (it will still be a little wet but should not be swimming in liquid).

In a food processor, add kale, cheese and bacon and blend until smooth.  You may need to do this in batches.  Taste the mixture and adjust seasonings as needed.

If using homemade pasta sheets, evenly space spoonfuls of the filling onto one sheet of dough. Each spoonful should be about two inches apart.  Lay a second sheet of dough over the first and press down around the filling to remove any air pockets. Use a pasta wheel or sharp knife to divide into individual ravioli. Be sure to leave at least a 1 inch border around each ball of filling.

If using wonton wrappers, set out a bowl of water to use as a kind of glue. Lay out several wrappers at a time and spoon the filling into their centres, wipe the edges with a wet finger or basting brush and fold diagonally in half to form little packages. Alternatively, you can use a second wonton wrapper to layer on top of the first, creating a square shape.

You can freeze any leftover filling by doling out spoonfuls onto a cookie sheet and then freezing them before putting them in a container, layered between parchment, for longer storage. When you're ready to use them, simply place the frozen filling onto pasta sheets and form, as described above.

To cook, drop a few ravioli at a time into a large pot of boiling, salted water. In the meantime, prepare the sauce. We like to serve these with a sage brown butter or simple garlic, butter, and white wine sauce. When the ravioli begin to float, they're done. Serve with the sauce and a dusting of grated Parmesan. Pair with the same beer you used to cook the kale.

Tuesday 27 December 2011

Lemon Tart

Out of all dessert options, my favourite is anything with lemon. Even when I am too full to eat dessert somehow I can always eat a crumbly lemon shortbread, one scoop of lighter than air lemon gelato, or a slice of lemon tart.  This lemon tart embodies the name 'tart' as it is just that.  It has a shortbread-like crust and a tart, slightly sweet filling.  Garnishing with raspberries provides a bit of extra sweetness and makes for a lovely presentation.  (I think that T-Moo will agree with me that lemon desserts are most enjoyable; however, we may agree to disagree on whose lemon tart recipe is better. So, keep watch for T-Moo's lemon tart recipe to come as we want you, our loyal readers, to decide and let us know which lemon tart reigns supreme).

Crust
1 cup all purpose flour, sifted
1/3 cup icing sugar
1/8 tsp salt
1/2 cup butter, cold and cut into small cubes

Lemon Filling
5oz ~3/4 cup regular cream cheese
1/2 cup sugar
2 eggs
1 Tbsp lemon zest
1/2 cup fresh squeezed lemon juice

1/2 pint of raspberries to garnish (optional)

Preheat oven to 425F, and grease an 8" tart pan with a removable bottom.  Set aside.

For the Crust: In a food processor combine flour, icing sugar and salt.  Process to combine.  Add the cold butter and pulse until the pastry comes together and forms small clumps.  Place the pastry in the tart pan and using your fingertips, press the pastry into the pan, covering the bottom and up the sides. Once the pastry is covering the tart pan, you can use a silicone spatula or back of a soup spoon to smooth the surface. Pierce the bottom of the crust with a fork about 10-15 times to prevent the pastry from rising up.  Chill the pastry in the freezer for about 15 minutes before baking to prevent the pastry from shrinking while it bakes (this is good time to clean out the bowl of your food processor as you will need it to prepare the filling). When the pastry is chilled, place the entire tart pan on a large baking sheet and into the oven. Bake for 13-15 minutes or until golden.  Remove the tart shell from the oven and place on a rack to cool while you prepare the filling. 

Reduce the oven temperature to 350F.

For the Filling:  Pulse the cream cheese in the food processor until smooth.  Add sugar and process until well combined.  Add the eggs, one at a time, and pulse until each is well incorporated.  Add the lemon zest and juice and blend until smooth.  Pour filling into prebaked tart shell and place in oven to bake for 25-30 minutes until the filling has set and no longer wobbles in centre.  Transfer to wire rack to cool (tart may develop a crack down centre while baking or cooling...no big deal, this just really proves it's homemade). Once cooled, cover and place in refrigerator and chill for at least 1 hour.  If garnishing with raspberries,  wash and dry raspberries and place around outer perimeter of tart where the lemon filling meets the shell. Serve!

Monday 26 December 2011

Chili hot chocolate


Wikipedia informs me that the Aztecs drank cocoa with vanilla and chili pepper. When the Europeans came along, they couldn't handle the heat and bitterness so they added sugar, milk, and removed the chili.  They called their version Ovaltine, despite the fact that the mug and jar are both round.  Adam and I have settled on something in between. We experimented a bit to determine the best way to incorporate the spice from the chili and found that simmering the pepper in milk yields just enough heat without knocking you off your chair.  The amount and sweetness of chocolate is really up to you, I prefer a combination of milk and dark chocolate. For a grown up version, add a dash of Grand Marnier or Triple Sec. You're welcome.

3 cups milk
1 red chili pepper
4-6 oz chocolate (or as much or little as you like)

Slice the chili lengthwise and remove the seeds. Warm the milk in a pot over medium-low heat to prevent scalding. Add the chili and simmer very gently for about 5 minutes until the milk tastes slightly spicy. Reduce the heat to low. In a separate pan or double boiler, melt the chocolate over low heat. Once melted, gradually add the hot milk while whisking.  If you do it the other way around (adding chocolate to the milk) the chocolate doesn't seem to incorporate completely. Pour into a mug and serve.

Sunday 25 December 2011

Leftover Turkey Soup

Now that you have brined and roasted your turkey, you may be wondering what to do with all that leftover meat (especially if, like us, you had a 19 pounder).  The answer - turkey soup.  This soup is a simple and convenient way use up all your leftover turkey.  The carcass can be boiled with some aromatics, such as onion, celery and carrots, to make a simple turkey stock.  If you're feeling under the weather (and looking for a cure to the common cold) or are too tired from the previous nights festivities to make turkey stock, a good quality chicken broth is a fine substitute.  This soup is delicious with a few crackers or some crusty bread.  Once you've had your fill of turkey, any leftover soup can be frozen for a quick weeknight dinner in the New Year.

Drizzle of olive oil
1 small onion, diced
3 ribs celery, diced
2 carrots, peeled and diced
1 clove of garlic, minced
2-3 cups of leftover turkey meat (light and dark), diced into bite sized pieces
4 litres of turkey stock or low sodium chicken stock
1/2-1 cup leftover gravy
1/2 (160 g) pkg of broad egg noddles
2 sprigs rosemary
2 sprigs thyme
salt and pepper to taste

In a large soup pot, heat oil over medium heat.  Add onion, celery and carrots and stir. Turn heat to medium-low, cover with a lid, and cook veggies for about 15 minutes or until translucent and soft.  Add garlic and cook for 1 minute.  Increase heat to medium-high, add turkey and brown for 2-3 minutes (you should begin to see brown bits caramelizing on the bottom of pot).  Next deglaze the pan with a bit of stock and scrape the brown bits off bottom. Add the remaining stock, gravy, rosemary, and thyme and bring to a boil. Turn heat to simmer, add noodles, and cover, cooking for 15 minutes until noodles are soft.  Remove rosemary and thyme sprigs. Serve and enjoy!

Happy Holidays!

Friday 23 December 2011

Orange cranberry sauce

Here's a confession - I actually love canned cranberry sauce, especially when it's served in a perfect log with the little ribbed indentations from the can still intact. As I've said before, I'm a classy broad. Anyway, I realize most people probably don't find this as appealing as I do so I'm posting a version that is also delicious and a little more gourmand.  I like this on the tart side but you can add more sugar or honey if you like it really sweet. It's pretty quick to make and you can do it well in advance if you like, just save it in the fridge and bring it out an hour or so before you serve the turkey so it can come up to room temperature. Feel free to shape it into a ribbed cylinder if you like.

This recipe makes enough cranberry sauce to accompany an 18 lb turkey for 20 people, with plenty of leftovers.

2 12 oz packages of fresh cranberries
juice of 2 oranges
zest of 1 orange
1/4 cup water (you may need a bit more depending on how much juice the oranges yield)
1/4 cup sugar
1/4 cup honey
2 oz orange liqueur (such as Grand Marnier or Triple Sec or Cointreau)

Combine all ingredients,except the liqueur, in a saucepan and heat on meadium-high for a few minutes, stirring regularly. Once the cranberries begin burst, reduce the heat to low and add the liqueur. Let simmer until the mixture thickens and the cranberries have softened, about 10 minutes. Let cool and serve at room temperature.

Aunt Catherine's Stuffing

This is the quintessential holiday dish that my family most looks forward to eating - it is simply the best stuffing ever.  The following recipe will make one batch of stuffing but if you are feeding a large crowd or one that likes stuffing to begin with, you may need to double or triple the 'batch'.  It is scary to admit, but the last time I made this stuffing with my mom for Thanksgiving, a quadruple batch was needed.  Our kitchen looked like some sort of stuffing crazy place with a mountain of chopped onions (not a pair of onion goggles in sight), trays of bread and more pounds of sausage than I lift in a typical workout!  It is safe to say that this recipe will always be on our holiday table and this season if it is not on yours, I guess I will consider you lucky because you don't yet know what you are missing.

1 lb. bulk sausage (Maple Leaf in freezer section) or 1 lb. of  mild italian sausages, casings removed
1/4 cup butter
2 onions chopped
1 1/2 cup celery, chopped
1 large apple, peeled and diced
3/4 cup cremini mushrooms, chopped
1 tbsp fresh thyme, chopped
5-6 fresh sage leaves, chopped
7 or 8 slices bread
poultry seasonings
salt & pepper to taste
1 medium potato cooked & mashed

Brown sausage meat in pan with 1/4 cup butter. In stages, add onion, celery, apple & mushrooms & cook on medium heat, about 15-20 minutes. Spinkle bread slices with poultry seasoning and toast under broiler until golden. Turn over bread slices and repeat.  Cut toasted bread into 1" cubes.

When sausage mixture is well cooked, remove to bowl and add toasted bread. Toss mixture well (your hands will work best for this, also feel free to really squish the mixture together to combine the flavours).  Next add the mashed potato, this will help the stuffing to stick together. 

Stuff turkey or place in an oven proof dish and warm just before serving.

Thursday 22 December 2011

Roasted Brined Turkey

Most holiday turkey is dry and tasteless and it's only saving grace (and the reason you enjoy it) is that it's smothered in gravy .  However, with minimal preparation and a bit of time, you can enjoy moist, juicy, flavourful turkey so good you'll wish that Christmas comes early next year.

Tools needed: large cooler & meat thermometer
Prep Time: 10-12 hours
Cook Time: dependent on size of turkey

For the brine:
2 litres of water
1 cup kosher salt
1/2 cup brown sugar
1 tbsp black peppercorns
1 tsp allspice or 4-5 allspice berries
2 sprigs Rosemary
3 sprigs Thyme
2-3 Bay leaves
1 stick cinnamon
10-12 liters of water (to cover turkey)
plenty of ice
1 turkey (15-20lb) fresh or defrosted
2 clementines
2 sprigs Rosemary

The night before you plan to roast your turkey:

In a large pot bring 2 litres of water to a boil and add salt, sugar, peppercorns and allspice. Boil the mixture until the salt and sugar have dissolved.  Once dissolved, turn off heat and set aside to cool completely. 

Once the brine mixture has cooled, pour into the cooler with rosemary, thyme, cinnamon and bay leaves.  Next, place the turkey into the cooler and fill with enough cold water to cover.  Add ice to ensure the turkey remains cold.  Place the lid on the cooler and store in a cool place overnight. Brine for 10-12 hours.

Day of roasting:

Preheat the oven to 375F. Remove the turkey from the brine, rinse with cold water, and pat dry.  Place the turkey, unstuffed, on rack in a roasting pan and add a couple sprigs of Rosemary and a few sliced clementines into the turkey cavity.  Insert digital thermometer into the deepest part of the thigh, without touching the bone.  Roast turkey until it reaches an internal temperature of 161F.  (Note: Be sure to set themometer to 161 F, not Celsius...setting to 161C may will result in a carbon encrusted turkey!).

Once turkey is done, cover with foil and a thick tea towel and let rest for 30 minutes.  Carve and enjoy! Here are some tips on how to Carve a Turkey.

Wednesday 21 December 2011

Bobs Lake Hotdogs


In both food and fashion, trends come and go.  Some are classic (hollandaise sauce, three piece suits, Yorkshire pudding) and others are best left to the annals of history (hamburger helper, bell bottoms, spray cheese).  Some are so offensive that we can, should and do run away from them full-tilt once we come to our collective senses (gelatin salads, pleated jeans, the side ponytail).  However, in our haste to put our indiscretions behind us we often cast aside things that have genuine merit (fondue, pocket squares, the turnip).  Fortunately, society occasionally resurrects these anachronisms and they may enjoy a renaissance (charcouterie, fedoras, bangs) or with luck may even become part of the permanent zeitgeist (tapas, wing tips, slow food).  It is with this aspiration that I propose the next potential revival: the humble cocktail weenie!

I know what you're thinking "Cocktail weenies?  Seriously?  Are you drunk?" and I hear you but bear with me on this because these aren't your average 1950s party-favour-in-a-can cocktail weenies.  These are made with fine Kentucky Bourbon, the brownest of the brown liquors!  Just like Ernest Hemingway, there's something fantastic that happens when you steep things in bourbon and cocktail weenies are no exception.  Granted, I've substituted Oscar Meyer's with Cumbrae's wild boar sausage, but I guarantee you the majority of the magic comes from the Wild Turkey and not the wild boar.

When I was a kid this dish was a staple of every party at my grandmother's cottage on the shores of Bobs Lake from which the dish gets its name.  It was one of her stand-bys partly because it's delicious and partly because you could buy all the ingredients at the local general store.  I'm not sure who among my grandmother and her cottage friends discovered the Bourbon secret but society shall be eternally grateful that they did!

6-10 sausages or hot dogs cut into 1 inch sections
1 cup ketchup
1 cup Kentucky bourbon
1/3 cup brown sugar
3 tablespoons grainy mustard

Combine all the ingredients in a pot over low heat, cover and bring to a simmer for at least 45 minutes to an hour, uncovering for the last 20 minutes so the sauce reduces a little.  The Bourbon needs at least 45-60 minutes to work its voodoo magic.  Stop short on the simmering and the results are decidedly sub-par.

When done, remove the weenies to a plate and skewer with toothpicks.  Pour the extra sauce into a small bowl for dipping.  Stand back and enjoy the compliments as your friends devour your retro-chic appetizer.

Tuesday 20 December 2011

Apricot and coconut granola

I'm not going to pretend this granola qualifies as health food; I recognize it veers more towards the "treat" end of the breakfast spectrum. However, I do think it's important to point out that it's choc full of heart-healthy fats, fiber, and omega-3's. It's also extremely delicious. You can store the granola in an air tight container at room temperature for about a week (if it lasts that long). It's great on it's own as a snack or served with greek yogurt, kefir, or milk.

Makes about 6 cups

2 3/4 cups rolled oats
2 cups mixed nuts (I like walnuts and sliced almonds)
1 cup unsweetened coconut flakes
2 tablespoons ground flax
1/2 teaspoon salt
1/4 cup light brown sugar
1/4 cup maple syrup
1/3 cup extra virgin olive oil
3/4 cup dried apricots, roughly chopped

Preheat the oven to 300F. In a large bowl, combine the oats, nuts, coconut, flax, and salt. In a small saucepan, combine the sugar, syrup and olive oil. Warm over low heat until the sugar has dissolved. Remove from heat and fold into the oat and nut mixture. Be sure to coat everything well.

Line a large rimmed baking sheet with parchment paper and spread the granola mixture over it. Bake until lightly golden and fragrant, about 35 minutes, stirring halfway through. Remove from the oven and stir in the chopped dried apricots. Allow to cool.

Monday 19 December 2011

Grilled ostrich with blackberry sauce

A guy at a restaurant once told me that stupid animals taste better (something I was inclined to believe because this guy looked like he was speaking from a vast background of personal experience) which is a rule that certainly holds true for the ostrich, an exceptionally stupid and delicious animal.  Unfortunately, ostrich is about as expensive as it is delicious and so I generally only cook it on special occasions like the holidays ... or 1/2 off sales on ostrich meat.

1 ostrich thigh
2 tablespoons of steak spice
1/4 pint fresh blackberries
2 teaspoons butter
1/2 cup chicken stock

Cut the ostrich into steaks of roughly equal thickness and season with steak spice.  This step is essential because the high density and low fat content of the meat make it nearly impossible to grill to an even doneness unless it`s all the same size. Place the ostrich steaks on a very hot grill or grill pan and cook until the centre reads ~140F on a meat thermometer, about 6 minutes per side. I use a meat thermometer because the dense meat is very hard to test by touching as you would with beef.

While the ostrich is cooking, melt 1 teaspoon of butter in a sauce pan over medium high heat and add berries.  Toss the berries in the butter and sautee for a couple of minutes until they start to turn purple in colour.  Add in the stock, reduce heat to low and simmer, half covered, until liquid is reduced by half. Remove from heat.

When ostrich is done, remove from heat, cover and let to rest for 5-10 minutes while finishing the sauce.  To finish the sauce, strain the berries through a fine mesh strainer into a saucepan, working the fruit with a spoon to extract as much juice as possible.  Bring strained juice to a simmer, stir in remaining butter and remove from heat.  When butter has melted in it will give the sauce a shimmering, silky texture.

Slice ostrich thinly and drizzle with sauce and serve.  Because it is so lean, this dish goes really well with risotto which adds some richness.  It's also great with smoked or roasted tomatoes.

Saturday 17 December 2011

Breakfast aux champignons

I learned how to make omelettes from a cooking teacher of mine who showed me that the most important ingredient in a good omlette is actually the pan.  If you want to make good omelettes, get a proper omelette pan and cook nothing else in it ... ever.  Mine is cast iron, perfectly seasoned, never sticks and I don't let other food so much as look at it.  Also, don't clean it with soap as this will remove the oils that prevent the omelettes from sticking.  A good nylon brush and some elbow grease or perhaps a little salt is all you need to clean it.

Omelettes are delicate things and so I think the best filling for them is something equally delicate yet delicious; sauteed chanterelle mushrooms.  Just about any mushroom is a good addition to an omelette but I think the buttery flavour and texture of chanterelles make for the ideal pairing with the subtle flavour and texture of the eggs.  Add to this the fact that everything is sauteed in butter and the result is something pretty decadent but that takes about 10 minutes to cook.

2 eggs
2 tsp butter
1 chanterelle mushroom sliced thickly
pinch of rosemary chopped
1 clove garlic, diced

Make the filling ahead of time.  The filling should be cooked and edible on its own as it's not going to cook at all in the omelette.  Slice the mushroom into pieces about 1cm thick so they retain some shape and bite once cooked.  Over medium-high heat, melt 1 tsp of butter in a frying pan large enough to contain the mushrooms in one layer.  Once the butter has started to foam up, add the herbs and mushrooms and saute, stirring all the while until the mushrooms are just starting to brown on the outside.  Add the garlic and continue to saute until fragrant then remove from heat and set aside.

Crack two eggs into a bowl and whip them with a fork until they are well mixed.  Heat your omelette pan to medium heat, add butter and swirl it around so the whole pan is coated.  When the butter foam starts to subside and before the butter has started to brown, add the eggs.

Let the eggs set in the pan for a few seconds so that the part touching the pan starts to cook and then keep the eggs moving by dragging your fork or a spatula through them and along the pan to allow fresh egg to flow in and contact the bare pan.  Continue to do so very slowly until the eggs begin to set but are still a bit runny.

Use your fork to level them out and shape them into a circle and remove the pan from heat so as not to let the eggs brown.  An ideal French omelette is actually still a little runny when it's still in the pan and has no hint of browning on the eggs (good restaurants will sooner throw out a browned omelette than serve it to you).  I'm not such a stickler for this but if you try to obey this rule you'll avoid having tough, dry, rubbery eggs which is definitely bad.

Add in filling and fold omellete over onto plate.  If you want to season your eggs with salt, do so after they have cooked to avoid a chemical reaction that can change the colour of raw eggs. Garnish with extra filling or fresh herbs and serve.  

Friday 16 December 2011

Vegetarian sushi rolls

Of all my personal shortcomings (and there are many), the one I'd change first is my fish allergy.  You might be wondering why a guy who can't eat fish is writing a post about sushi and your concerns are indeed valid.  After all, what can a guy who can't so much as look at a fish stick tell you about making sushi?

Well as it happens, quite a bit.  Because of my allergy, I can't really eat sushi in a restaurant as even the vegetarian rolls inevitably get contaminated.  So if I want to eat sushi I have to make it myself, which I do quite frequently.  It's easy, delicious and makes one of the best appetizers ever.

Because the fish is generally uncooked, making sushi is really about rice and rolling.  That and buying really good fish but you're on your own on that front.

Rolls:
1 cup sushi rice
1 1/2 cups water
1 package noori (seaweed paper)
1 tablespoon rice wine vinegar
1 teaspoon sugar

Vegi-filling (all items julienned):
1 avocado
1/2 red pepper
1/2 mango
1/2 cucumber

Wash the rice in a strainer until the water runs clear.  This is key as if you don't do it the rice won't become properly sticky and you'll end up with something more akin to rice pudding.

Put rice in a pot and add water until rice is just covered.  Add sugar and heat on medium high.  When water boils, stir rice, turn heat to low and cover with a tight lid.  Simmer until water has cooked off (~10-15 minutes) and remove rice to a large bowl to cool.  As rice cools start cutting and folding it with a wooden spoon while gradually adding in the vinegar.  As it cools, the rice will start to take on the sticky texture that holds the rolls together.

Place noori on a sushi mat and use two spoons to spread rice on top in a thin layer, leaving 1" or so of free space at the top of the noori sheet.

Arrange filling in a thin line starting 1" above the bottom of the noori. Use the mat to roll the noori up and over the filling, contunuing until the noori is rolled into a tight cylinder. Repeat until filling and rice are all used up or until you run out of places to store the vast quantities of sushi you have made.

Let rolls rest for ~2 minutes so that noori has a chance to seal before cutting.  When cutting the rolls, wipe some sesame oil across the knife to prevent it from sticking to the rolls.

Serve with soy sauce, wasabi and pickled ginger.


Thursday 15 December 2011

Serrano ham wrapped pork tenderloin

I was tempted to call this recipe pigs in a pig blanket but I managed to keep my inner cheeseball in check. This is a really quick and simple dish that's special enough to serve to guests but easy enough to make any day of the week. The leftovers are delicious on a sandwich as well. I used Serrano ham because that's what I had in my fridge but you could easily use Prosciutto as well. The key is to have it sliced very thinly so that it's easy to wrap and sticks to the Dijon mustard glue. Also be sure to use your sharpest knife when slicing the tenderloin as it will help keep the ham from falling off.

We served this on a bed of caramelized onion and apple chutney with a side of roasted Romanesco cauliflower. It would also be delicious on top of a mixed greens salad.

1 pork tenderloin
1 tablespoon Dijon mustard
freshly ground black pepper
6-8 slices Serrano ham (very thinly sliced)
drizzle of grapeseed oil

Preheat oven to 375F. Pat the pork tenderloin dry with paper towel and coat it with the mustard. Lay the ham slices on a plate or cutting board side by side in a row, long sides slightly overlapping, so that the row of slices is roughly the same length as the pork. Place the pork tenderloin in the middle of the row and wrap it snugly with the ham.

In an oven-proof frying pan, heat a drizzle of oil on high. When the pan is hot, add the pork and sear for about 1 minute on each side. You want the pan to be hot enough to sear the pork but not so hot that it burns it. When the pork is evenly seared, transfer the entire pan to the oven and roast for  about 15 minutes or until it reaches an internal temperature of 150 degrees. Remove the pork from the oven and let it rest for 5-10 minutes. Slice into 1/4" slices and serve.

Carmelized Onion and Apple Chutney

After much thought and clarification from dictionary.com, I confirmed that this is in fact a chutney and not a compote as I originally thought.  The difference you ask...a chutney is sweet and sour containing fruits and spices where a compote involves cooking fruit in sugar or syrup.  So with the addition of ginger, dried mustard and vinegar, I declare this recipe a chutney!  We ate this chutney with Serrano ham wrapped pork tenderloin, and it was delicious.  You can't beat the combo of apples and pork! 

This chutney would also be ever so delicious on top of a baked Brie, served with nutty crackers - a crowd pleasing Holiday appetizer.

drizzle olive oil
1 large onion, sliced
2 apples, peeled, cored and thinly sliced
1 garlic clove, minced
1 tbsp ginger, minced
1/2 tsp dried mustard
2 tbsp white wine vinegar
1 tbsp mirin
1 tbsp brown sugar
salt and pepper

In a pan with a lid on medium heat, heat oil then add onions and a pinch of salt.  Let the onions cook, stirring occasionally for about 7-8 minutes until they start to turn translucent.  Add apples, garlic and ginger.  Cook for about 5 minutes.  Next add mustard, white wine vinegar, mirin, brown sugar and pinch of pepper. Cover with lid and cook for about 10 minutes.  After about 10 minutes, onions and apples should be soft.  Use the back of a wodden spoon to break up any large apple slices or onions and meld together into a chunky sauce. 

Wednesday 14 December 2011

Roasted Romanesco cauliflower


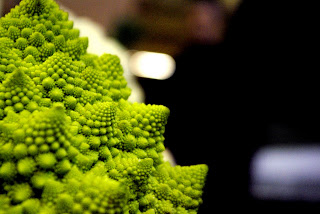
If you've never roasted broccoli or cauliflower, I strongly urge you to try it. Roasting caramelizes the sugars in the vegetables (yes, vegetables contain sugar) and results in a sweet, nutty flavour with none of the usual bitterness. Unlike steamed or boiled versions, which tend to be a little on the mushy side, roasting preserves some of the vegetable's texture. When Adam spotted this gorgeous Romanesco cauliflower at the market we knew we had to try it this way.

Romanesco cauliflower is somewhere between broccoli and regular cauliflower in taste and texture. It's unarguably the most beautiful of the three and I find it slightly sweeter as well. Adam would be disappointed if I didn't mention it's mathematical properties; the spirals on the head of the cauliflower follow the Fibonacci sequence, which basically makes this vegetable a big deal if you're a math whiz. All I know is that it barely made it on to the plate as the three of us scarfed it down straight from the pan.


2 heads Romanesco cauliflower
drizzle of olive oil
pinch of chili flakes or chili powder
pinch of salt and pepper
1 1/2 tablespoons whole wheat bread crumbs
2 tablespoons freshly grated cheese (I usually use a combination of Parmesan and cheddar)

Preheat the oven to 400F and line a baking sheet with parchment paper. Remove the thick stems and base of the cauliflower and break the head into pieces. Toss the cauliflower with the olive oil, chili flakes, salt and pepper and spread out evenly on the baking sheet. Mix the bread crumbs and cheese together in a bowl and sprinkle over the cauliflower. Roast for 25-30 minutes until golden and fork tender.

Tuesday 13 December 2011

Potato salad with mustard vinaigrette

This is a recipe I came up with as part of a nine course meal we cooked for our friends. I thought it might be fun and entertaining to take something as basic and bland as potato salad, give it a makeover, dress it up, and introduce it to my classy friends (ha!) at a cocktail party. Then everyone would realize that the bland, homely potato salad was really a beauty who just needed a new look...er, I mean, new ingredients. It works in Hollywood, right?

To accomplish this transformation from barbecue favourite to cocktail party fare, I first added a pop of colour with purple potatoes (that old version was just so washed out!). Then I opted for a tangy mustard vinaigrette instead of the traditional mayo-based dressing. I removed the hard boiled eggs (the equivalent of dork glasses) but kept the fresh dill and enhanced it with some bacon. I also served the salad in a Belgian endive spear and paired it with a vodka martini.  Just like Sandra Bullock in Miss Congeniality, everyone was amazed and delighted by the classy new salad. Of course I knew it was there all along, hidden beneath a thick layer of mayonnaise and hard boiled egg, waiting to be unleashed.

Makes 15-20 hors d'oeuvres

2 pounds of new and purple potatoes, diced into ½” pieces
6 slices bacon, chopped
1 package of dill, finely chopped
4 green onions, finely chopped
1 tablespoon of Dijon mustard
¼ cup olive oil
2 tablespoons champagne or white wine vinegar
Salt and pepper to taste
15-20 endive spears

Place the purple and new potatoes in separate pots (otherwise the purple potatoes will dye the white ones an unattractive grey) and cover with cold salted water. Bring to a simmer over medium heat and simmer without the lid until tender, about 10-12 minutes.  Set aside to cool.  While potatoes are cooking, fry the bacon until crisp (best done over low heat). Whisk together mustard, olive oil, vinegar and salt and pepper. In a salad bowl, toss together the potatoes, dill, onions, bacon, and salad dressing.

Line the endive spears up on a serving platter. Place 3 or 4 pieces of potato in each spear, or as many as it can hold without making an awkward mess, and serve. 

Monday 12 December 2011

Braised beef cheek linguine

Some readers may not be familiar with beef cheeks as a cut of meat. Unlike, say, sweet breads, which are neither sweet nor bread, beef cheeks are exactly what they sound like. This might put some people off trying them which is a huge shame as they taste amazing.  They are a little tougher than the average cut of beef and require a bit of TLC before they come into their own and so this dish takes a bit of time (just finding beef cheeks can be a mission) but it's totally worth it.

Because of the huge amount of collagen in beef cheeks they create a very thick braising liquid.  For this reason I think they make an ideal pairing with fresh pasta as it lends the whole dish a velvety texture that you can't recreate with other cuts of meat.  It also really coats your mouth so you can pair this dish with the biggest, baddest red wine you want and never worry that the wine will overpower the food.

You may have to talk to your butcher a few days in advance as not many places stock beef cheeks on a regular basis.  I get them from Whitehouse Meats in Toronto's St. Lawrence market as they are one of the best butchers in town and one of the few that regularly stock cheeks.

Makes 4-6 servings

4 beef cheeks
1 1/2 cups red wine
2 cans whole plum tomatoes (if you're fancy you could blanche and peel your own tomatoes but I have a day job so that ain't happening!)
2 shallots diced
3 cloves of garlic diced
2 small carrots, peeled and chopped
1/2 tbsp balsamic vinegar
1 tsp salt
1 tsp cracked black pepper
1 tbsp olive or grapeseed oil
1 sprig fresh rosemary diced
1 sprig rosemary whole
1/2 tbsp duck fat or oil for frying

Carefully remove and discard the silver skin using a sharp boning knife or simply by pulling it off with your hands or with pliers to keep a steady grip.  Combine the shallots, garlic, spices and vinegar in a non-reactive dish, add the cheeks and cover with wine to marinate for 1-24 hours (longer time = bigger flavour).

Preheat oven to 300F. Remove the cheeks, pat dry and reserve the marinade.  Brown cheeks on all sides in oil over high heat (~1 minute per side) in a high sided oven proof frying pan or dutch oven. Add the marinade and tomatoes to the pot, cover and braise in the oven for approximately 3 hours. For the last 1/2 hour, remove the lid and turn the oven up to 350F. This will help caramelize the sugars and boil off some of the liquid. At this point you should taste the sauce and add more salt and pepper if necessary.

While the sauce is braising, make the fresh pasta.  If you don't have a pasta maker, you can roll out portions of the pasta dough by hand and cut the noodles with a knife. In this case, I'd suggest tagliatelle instead of linguine as it will be easier to cut the pasta dough.

To make the rosemary garnish, remove the woody stem from the whole rosemary sprig and fry the leaves in the duck fat in a small frying pan until they become crispy.  Set aside on paper towels to drain.

When the liquid in the sauce has reduced by about half, remove from the oven. Carefully remove 4-6 large portions of beef, set aside on a plate and cover with foil. At this time, you can start to boil a large pot of salted water for the pasta. Using two forks, shred the rest of the meat and break up the tomatoes.  If there's still too much liquid, you may have to reduce it a bit further on the stove or put it back in the oven for a while.

Cook the noodles until al dente and drain. Combine with the sauce until evenly coated and portion out onto plates.  Top each dish with the reserved chunks of beef and garnish with the crispy rosemary. You can add a light dusting of Parmesan cheese if desired.

Sunday 11 December 2011

Coconut Shrimp with Creamy Curry Dipping Sauce


These coconut shrimp are packed with flavour and, unlike the usual deep-fried version, these are baked in the oven until deliciously crisp. Just the like 'Guiltless' Mac and Cheese this meal doesn't feel like it can only be enjoyed as a guilty pleasure. By baking the shrimp you eliminate the grease factor and I think the flavour of shrimp and coconut comes though cleanly. Isn't that what coconut shrimp is all about?!? (I know some of you will say 'no, I like my deep-fried version'...but give this a go, I think you will be a convert). These shrimp would make a great appetizer for the holidays or a simple supper served with some sautéed snow peas, pea shoots or a nice green salad.


1 lb of 16-20 count shrimp (if frozen, ensure they're uncooked, defrosted with shells removed - however tail can be kept on for presentation)
1/3 cup cornstarch
1/2 tsp cayenne pepper
pinch of salt
3 egg whites
1 tbsp olive oil
3/4 cup Panko breadcrumbs
3/4 cup shredded sweetened coconut
1/4 cup mayonnaise
1 tsp curry powder
1 1/2 tbsp peach or mango jam
Squeeze lemon juice

Preheat oven to 375F. Prepare a baking sheet with an oiled baking rack on top of it.
In a frying pan, heat olive oil and toast Panko over medium heat until lightly browned.  Remove from pan, add coconut, and toast.  Once toasted remove from heat and set aside.

Next you will need 3 shallow dishes to set up a breading station.  In the first dish mix together 1/4 cup cornstarch, cayenne, and a pinch of salt.  In the second dish whip the egg whites until frothy.
In the last dish mix together Panko and coconut.

Rinse and pat shrimp dry.  One or two at a time, coat the shrimp in the cornstarch mix followed by egg whites then the Panko/coconut mixture.  Make sure to coat well with the Panko and coconut, you may need to press lightly to make sure it adheres.  Once coated, place shrimp onto the baking rack.  Once all are complete, bake the shrimp for about 10 minutes until tails are pink and shrimp are just firm. 

While shrimp bake, make the dipping sauce by stirring together mayonnaise, curry powder, peach jam and lemon juice.

Friday 9 December 2011

Breakfast Overnight - Steel Cut Oats

I have never really been a 'morning person' or a fan of breakfast for that matter and would rather sleep in for 10 extra minutes than make eggs, or toast, etc.  However, this has recently changed since I discovered steel cut oats and an extremely easy way to make them.  Now, when I wake up my breakfast is actually waiting for me!  Steel cut oats have great texture, unlike quick cooking oatmeal, however with that require quite a bit of time to soften.  In this recipe, adding the oats to hot water and letting sit overnight, allows the oats to slowly absorb the water and soften, where only heating is required in the AM! 

drizzle veg. oil
1/4 cup Steel Cut Oats
1 cup hot/boiling water
1 cinnamon stick

1/4 cup milk
1 tbsp maple syrup
blueberries or any fresh fruit

Before bed:  In a saucepan with a lid, heat a drizzle of oil, and add the oats.  Toast the oats over the heat for about 1-2 minutes.  Add cinnamon stick and water and bring to a boil.  Then turn off the burner and cover with lid.  Let this sit on your stove covered overnight.

Sleep zzz

Morning:  Add milk to the oats, and heat on medium til warm. Pour into bowl and drizzle with 1 tbsp of maple syrup and blueberries or fresh fruit.


Wednesday 7 December 2011

Spaghetti "carbonara" with leeks and pea shoots

My plan for dinner this evening was to make something fast, delicious and relatively healthy (I'm battling a cold right now) that would also allow me to use up the stockpile of leeks wilting in my refrigerator. I often make a carbonara style pasta as a quick supper as it's incredibly simple and we usually have eggs on hand. A true carbonara would include bacon or pancetta, bacon or pancetta fat, and a lot more cheese. I like to tell myself that using a modest amount of Prosciutto and a dusting of Parmesan makes it lighter.  I also gave myself bonus points for incorporating vitamin-packed pea shoots (which also happen to be my latest food obsession). I love it when a plan comes together!

The amount of pasta water required at the end depends somewhat on the type of pasta you use. I used whole wheat pasta which tends to soak up more sauce. Use as much as you need to achieve a silky smooth consistency. 

Makes 2 servings

drizzle of grape seed oil
4 slices Prosciutto
1 leek, thoroughly washed, roots and tips removed
handful of pea shoots (about 1 1/2 cups)
2 eggs
1/4 cup freshly grated Parmesan
120 grams spaghetti or other long pasta (about 1/3 standard package)
salt and pepper
1/2 cup reserved pasta water (approx)

Slice the leek in half lengthwise and then chop each half into 1/4" pieces. Slice the Prosciutto into thin strips and sprinkle into a saute pan along with a light drizzle of grape seed oil. Saute on medium-high heat til the Prosciutto begins to brown. Add the leeks and a generous sprinkle of freshly ground black pepper. Stir and let cook for 1 minute. Reduce the heat to medium, cover the pan with a lid and let cook for 4-5 minutes until the leeks are soft.

Bring a large pot of water to boil and salt generously. Add the pasta. While the pasta cooks, crack two eggs into a bowl, add the 1/4 cup of Parmesan and whisk. Set aside.

Once the leeks are softened, add the pea shoots to the pan. Stir, cover, and cook for 3-5 minutes until the pea shoots have wilted slightly but are still tender. Once the pasta is al dente, drain (don't forget to save at least 1/2 cup of pasta water) and add to the pan with the leeks and pea shoots. Remove the pan from the heat and quickly add the egg mixture while tossing the pasta (tongs work well here). You want to coat the pasta with the egg and keep it moving so it doesn't scramble. Add a small amount of the reserved pasta water and continue tossing. Continue adding small amounts of pasta water until the desired consistency is achieved.  Serve with a light dusting of freshly grated Parmesan.

Tuesday 6 December 2011

Tourtiere

In my opinion, this Quebecois dish is the best part about Christmas aside from the presents and taking a couple of days off work.  Just the smell of this dish makes me think of cold days, warm nights by the fire and my father yelling at the TV while the Leafs lose.  In a word it smells like home!

Aside from the snow mobile, the automatic rifle, tubeless tires and the hockey fight, Tourtiere is definitely Quebec's finest invention and I'm amazed it has not spread much further than the province next door since its invention.  If you're looking for an alternative or an addition to Turkey this holiday season then I highly recommend this dish.  It's easy to make, can be made in one big pie or many little tarts (as seen below) and makes fabulous left-overs. I have used ground pork and lamb for the filling but you can also use ground beef, turkey, chicken, veal, or any combination that you might like. In Quebec they even occasionally use salmon.

1 package ground pork
1 package ground lamb
2 cooking onions diced
4 cloves of garlic minced
1 tablespoon olive oil
3/4 cup bread crumbs
1 tablespoon allspice (1 teaspoon if pre-ground)
4-5 cloves
1 teaspoon peppercorns
1 teaspoon salt

2 pie shells or 24 tart shells

Preheat oven to 375F.

Grind spices and toast in large frying pan on high until  just smoking. Add in olive oil and onions and saute 2-3 minutes until they begin to become translucent. Add in garlic and saute a further 2 minutes until fragrant. Crumble in meat and cook until browned. Mix in bread crumbs and remove from heat. Let cool.

Mound filling into 1 pie shell or half of the tart shells (you could make your own pie crusts if you're fancy like that but I never bother). Place the second pie shell or remaining tart shells over top of first and press around edges to seal.  Cut holes for steam to escape and place pie or tarts into  oven for 10-15 minutes or until crusts are golden brown.

Remove from oven and let stand for 5-10 minutes before serving.  Serve with chili sauce or spicy ketchup.

Monday 5 December 2011

Soup "B" aka Thai Coconut Curry Soup

Back in university (a shout out to all the Queen's University alumni) living with 5 other girls, there were 2 main staple foods in my household.  The first and most popular was 'peanut noodles', this dish merely consisted of Asian noodles topped with store bought peanut sauce.  They were simple and easy and this is probably why at any given point in the day - breakfast, lunch, dinner, snack & after bar snack (all the main meals of the day...) this dish was being consumed by someone.  The second most popular, in my mind anyway was Soup "B".  Soup "B", not Soup A, C or D, was a delicious coconut curry soup which we ordered from a hole-in-the-wall Thai/Cambodian restaurant named "Royal Angkor" for $7.95 served with a side of rice. (if you are ever in Kingston, ON, I highly recommend making a stop for lunch...even if you are not in the area, I recommend going so you can eat this soup!)  After graduating and moving back to Toronto my "Soup B" consumption level was non-existent which forced me into having to attempt to recreate my own version.  Now, I can't say this is Soup "B" exactly as Angkor would make it but, all the flavours are there and every time I eat this it takes me back to my university days and many fond memories. 


1 tbsp canola oil
1 to 2 stalks lemongrass, outer sheath removed, bottom 3 inches trimmed and grated
2 tbsp ginger, minced
1 large clove garlic, minced
2-3 tsp Thai green curry paste
6 cups homemade chicken stock
3 tbsp fish sauce
1 tbsp brown sugar
4 or 5 lime leaves
2 (14oz) cans unsweetened coconut milk
2 boneless, skinless chicken breasts*, cut into thin strips
2 bundles fresh Enoki mushrooms
2 small fresh red/green Thai chillis
1 tbsp soy sauce
3 tbsp lime juice
6-8 Thai basil leaves, slivered
fresh cilantro - to garnish
green onions sliced - to garnish


* Can substitute 1/2 pound of peeled and deveined medium shrimp instead of chicken.

Heat the oil in a large stockpot over medium heat.  Add the lemongrass, ginger and garlic and cook, stirring constantly, until aromatic, about 30 - 60 seconds.  Add the curry paste and cook, stirring constantly, for 30 seconds. 

Add 1/2 cup chicken stock to the pot and stir to dissolve the curry paste.  Add the remaining stock, fish sauce, brown sugar and lime leaves and bring to a boil over medium-high heat.  Reduce to low, partially cover and simmer to blend flavours about 20 mins.

Stir in coconut milk, chicken, mushrooms, red chillis, soy sauce and lime juice.  Bring back to a simmer and cook until the stock is hot and the chicken is no longer pink, about 10 minutes.  Taste for seasoning. 
Serve with cilantro, green onions and Thai basil.

Thursday 1 December 2011

Vino caliente

It’s my belief that hot drinks are as important to winter survival as a toque (aka hat for our non-Canadian readers) and a daily dose of vitamin D. As children, hot chocolate was the go-to choice. As an adult, my preference has been for something a little more complex and, when appropriate, gently spiked. A few weeks ago I wrote a post about the dream-worthiness of spiced cider and rum on a snowy winter’s day. I’ve also been known to enjoy a grown up chili hot chocolate with a splash of Grand Marnier as an apres-ski treat. Most recently, my warm drink cravings were satisfied by a new discovery: vino caliente.

I owe this discovery to the Colombians, specifically Bogotanos, who probably got it from their friends in Spain (it’s basically warm sangria), though it seems this recipe can be found in some form all over Europe. Unsurprisingly there is something widely appealing about hot mulled wine. I tried a few versions while in Colombia including one with uchuva, or cape gooseberries, which have a tart flavour similar to ripe cherry tomatoes. Since these are hard to find in Canada, I used orange and lemon to impart a similar tartness. Feel free to add more honey if you prefer something sweeter. This would also be delicious with clementines or mandarin oranges.

As always, please enjoy your vino caliente and other holiday drinks responsibly. This means no drinking and driving including GT snow racers and toboggans.

Serves 4-6
2 cups water
5 whole cloves
2 cinnamon sticks
peel and juice of one orange
peel of one lemon
3 tablespoons honey
1 bottle dry red wine
1/4 cup sugar for garnishing the glasses

Rim 4-6 wine glasses with sugar and set aside. Combine the water, spices, juice, peels and honey in a pot. Bring to a boil, reduce heat and simmer for 15-20 minutes to allow the mixture to reduce and the flavours to develop. Reduce heat to low and add the wine. Do not boil (you'll cook off the alcohol in the wine) but gently heat the mixture for 2-3 minutes until warm. Strain into a wine glass and garnish with a slice of orange or a cinnamon stick.

Spinach, Artichoke & Roasted Red Pepper Lasagna

This lasagna is a great way to feed a family and satisfy everyone (meat eaters included).  However, I know some of you are thinking veggie lasagna is boring, lacks a rich flavour or that all the veggies fall out once it is cut and served. To avoid all the prior I have combine chopped spinach and marinated artichokes directly into the sauce, doing this imparts great flavour to the sauce and makes assembly much quicker as you are not spending time layering vegetables in addition to the noodles and cheese.  The other great thing about this recipe is that you can keep most ingredients on hand in the pantry, only having to shop for a couple items like ricotta and fresh herbs, which makes this easy to whip up on short notice (perhaps family or friends dropping in for a weeknight dinner)!


Serves a crowd
25 mins prep time
65 minutes bake time

1 tbsp olive oil
1/2 large onion chopped (or 1 small)
2 cloves garlic, squished
1 pkg frozen chopped spinach, thawed and squeezed of excess water
1 large jar marinated artichokes, chopped
fresh basil, chopped (as much as you like)
1/2 tsp dried oregano
1/2 tsp red pepper flakes
2 jars of your favourite tomato sauce (divided) 1 1/2 jars and 1/2 jar
1/2 cup water
1 jar roasted red peppers, thinly sliced

1 cup shredded skim mozzarella cheese
1 container light ricotta cheese
1/4 cup fresh grated Parmesan cheese + extra for topping
1/2 cup fresh chopped parsley
1 egg
salt & pepper
1 box (375 g) ready cooked lasagna noodles

Preheat oven to 350 degrees F and grease a 9x13" baking dish.
In a large saute pan over medium heat saute, onion, garlic, spinach, artichokes, basil, oregano and red pepper flakes in the olive oil. Add in 1 1/2 jars pasta sauce and water and simmer 10 minutes.
In a large bowl mix mozzarella cheese, ricotta cheese, Parmesan cheese, parsley, salt, pepper and egg. Set aside.

Place a 1/2 of reserved plain sauce (1/4 jar) in the bottom of a baking dish. Place layer of uncooked noodles on top of sauce and top with thin layer of spinach sauce. Add layer of noodles and layer with 1/2 spinach sauce followed by 1/2 cheese mixture then layer on all sliced roasted red peppers, add another layer of noodles and repeat with remaining spinach sauce and cheese. Last layer with noodles and top with rest of reserved plain sauce.

Cover with foil and bake in a preheated oven for 55 minutes.  After 55 minutes, remove foil sprinkle with extra Parmesan and bake another 10 minutes. Let sit 10 minutes before serving.